Auto Weight Pro
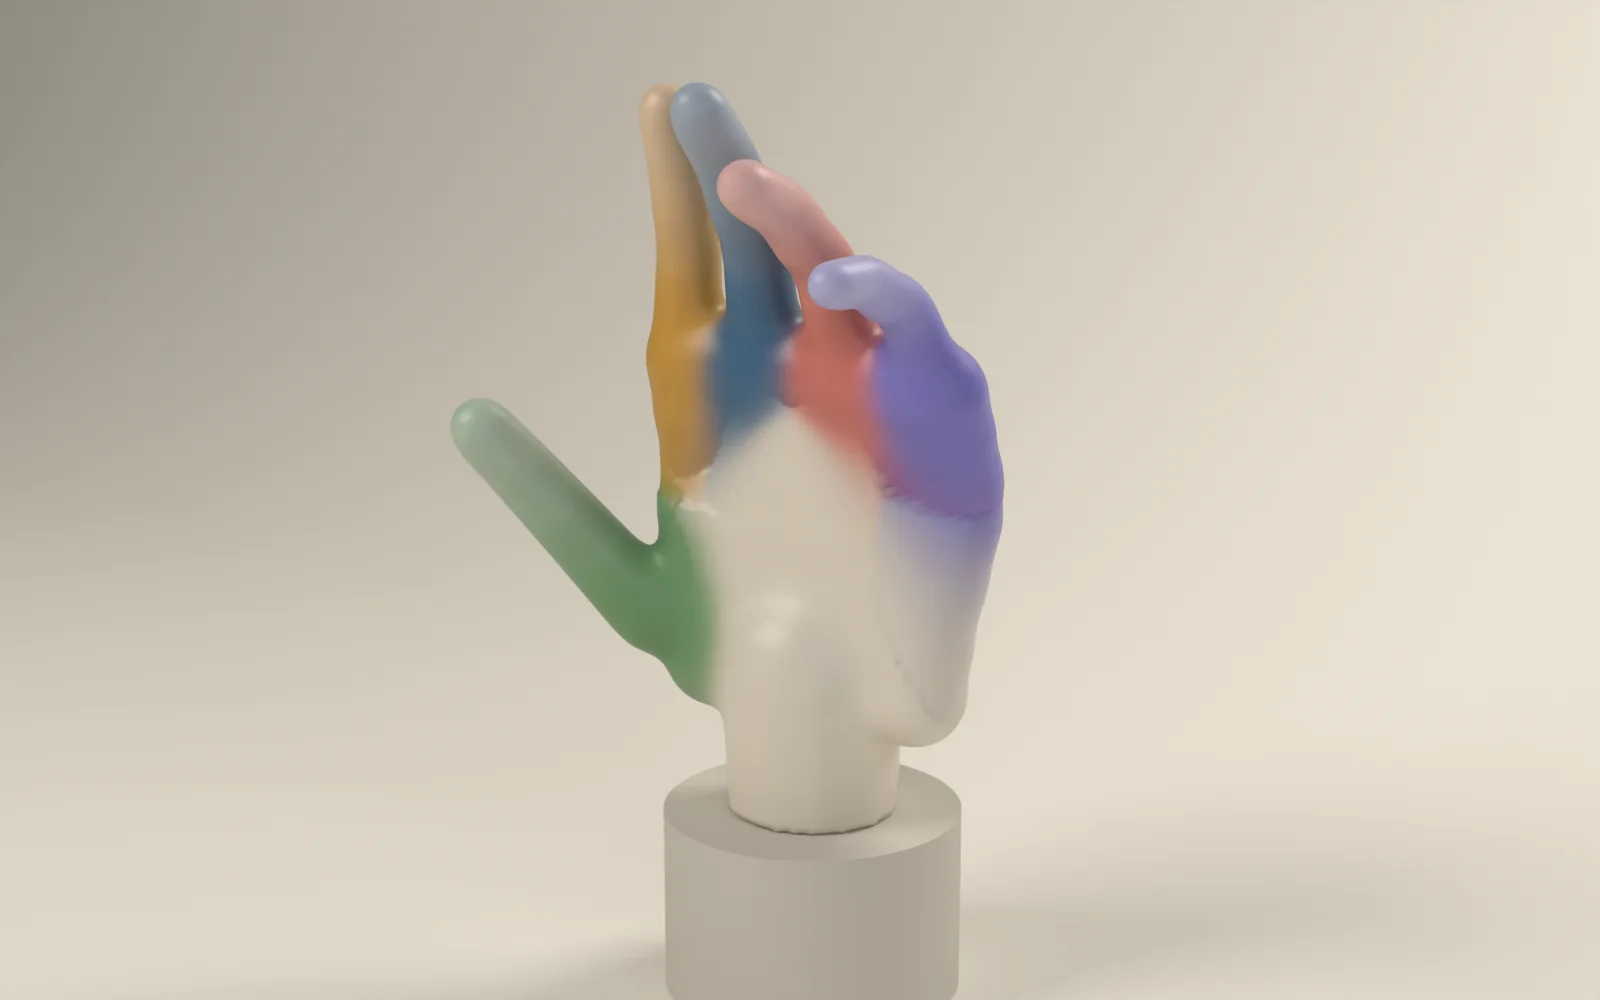
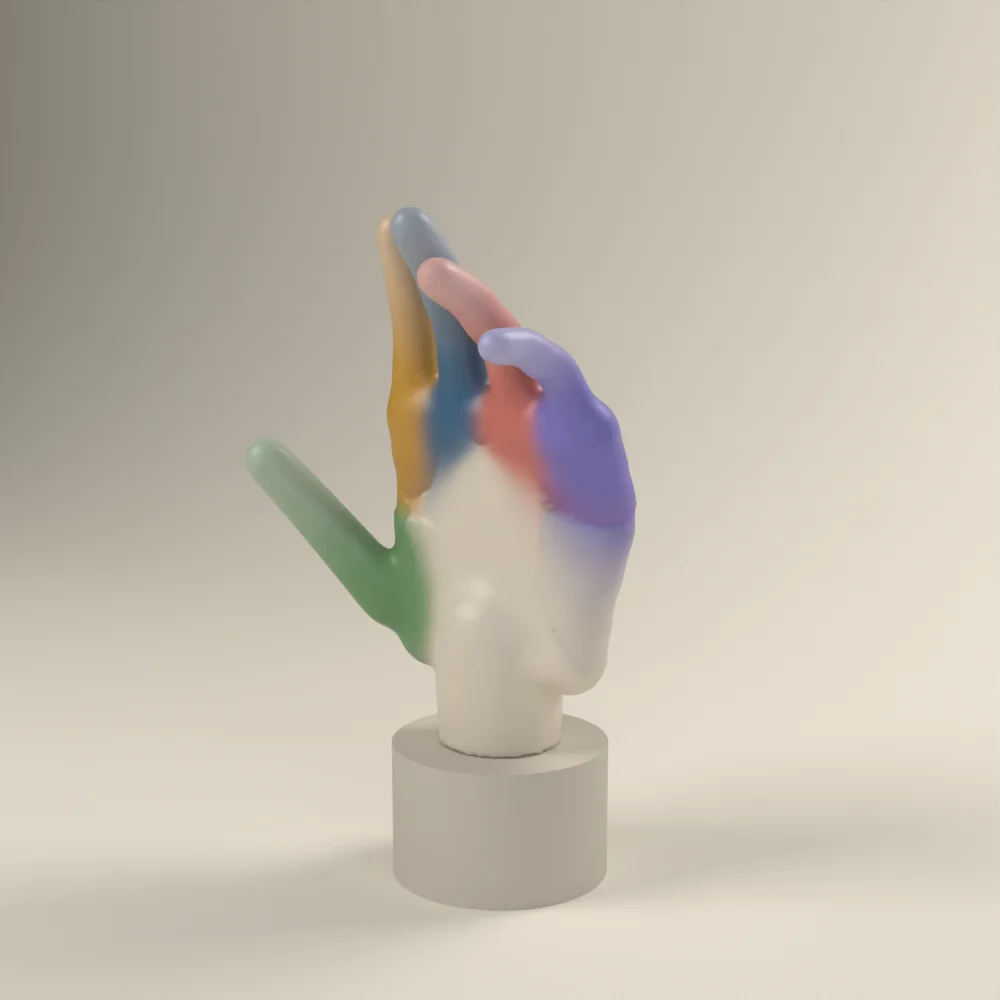
Automatic weight painting for Blender that gets the hard cases right. Fingers that stay fingers, clothing that follows the skin, and a clean-up and diagnostics toolkit that leaves a rig ready to animate or export, without touching anything you didn't select.
- Works with
- Blender 4.2 LTS and newer. Tested on 4.2, 4.4 and 5.1
- Binding
- 8 methods, from Robust Heat to Geodesic and Rigid per part
- Toolkit
- Clean-up pipeline, clothing fit, diagnostics, range-of-motion test, presets
- Verified
- 58 automated tests in headless Blender, across three Blender versions
Weight painting, handled
Weight painting decides how much each bone moves each vertex. Blender's built-in Automatic Weights gets you started, but it fails silently on small or messy models, lets neighbouring fingers pull on each other, has no idea a jumper should follow the torso underneath it, and leaves you to find stray weights by eye.
Auto Weight Pro replaces that single button with a complete workflow: a choice of binding methods that suit different kinds of model, a configurable clean-up pipeline that runs after every bind, tools for clothing and accessories, and diagnostics that tell you exactly what is wrong and select it for you.
Eight binding methods
Robust Heat, Bone Heat, Geodesic, Proxy Heat, Envelope, Distance and two rigid modes. Choose the one that suits the model, not the other way round.
Geodesic binding
Influence travels along the surface, not through the air, so touching fingers, legs and arms against the body don't bleed into each other.
Fit Clothing to Body
One click copies a weighted body's skinning onto garments, matching skin that faces the same way, so sleeves and trousers follow the right limb.
Clean-up pipeline
Smooth, Clean, Limit to N bones, Normalise and Mirror after every bind or on demand, with locked groups always respected.
Diagnostics
Unweighted, over-limit and non-normalised vertices, empty and orphan groups. One click selects the problem vertices so you can see them.
Range of motion test
Generates an animation that bends every bone in turn so you can scrub the timeline and spot bad joints. Clear puts your own animation back.
Fingers that stay fingers
Most automatic weighting measures how close each vertex is to each bone in a straight line through space. On a hand, the side of the middle finger is almost as close to the ring finger's bone as to its own, so when you bend one finger the next one comes with it. Riggers usually fix this by hand, one finger at a time.
The Geodesic method measures differently. Each bone first claims only the vertices it can see from its own centre line, where the surface also faces away from it. That rules out the neighbouring finger even where the two touch, because the neighbour's skin faces back towards the bone. The bone's influence then spreads along the surface of the mesh. To reach the next finger it would have to travel down to the knuckle and back up the other side, by which point its weight has faded away.
The same hand, bound two ways
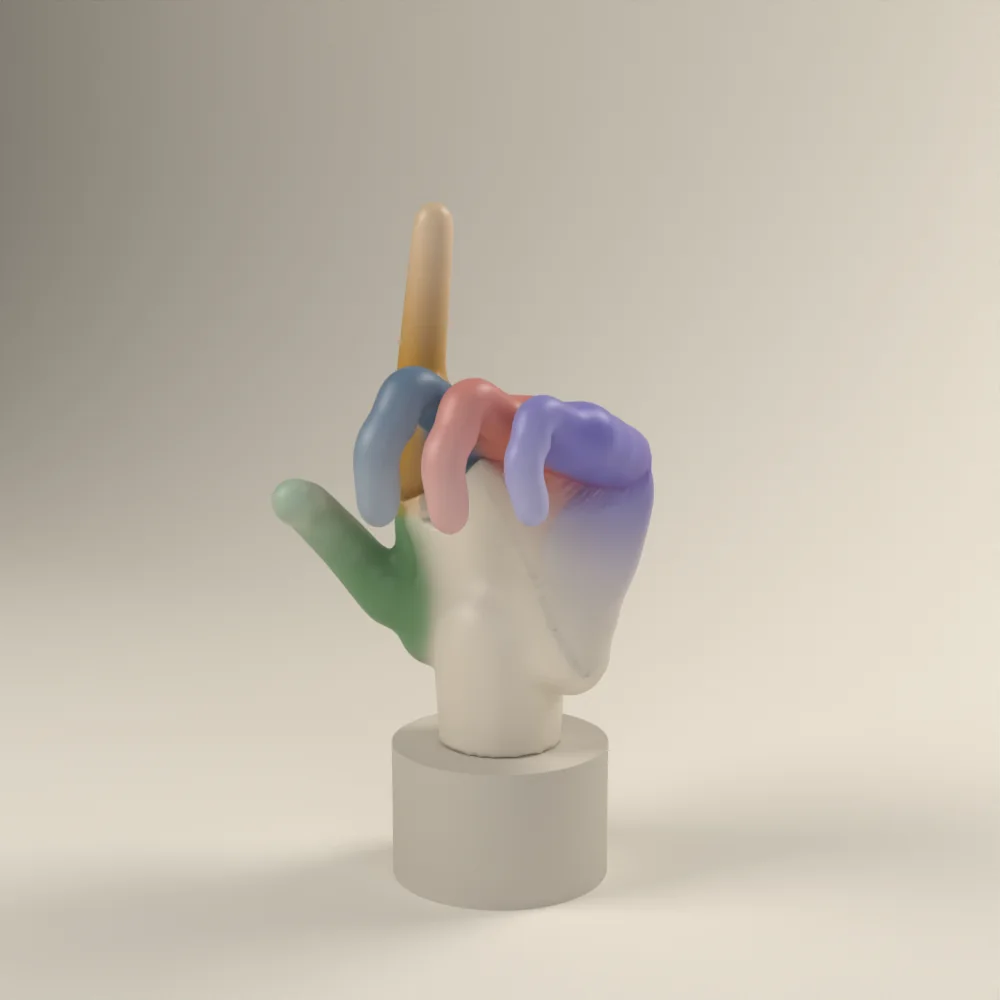
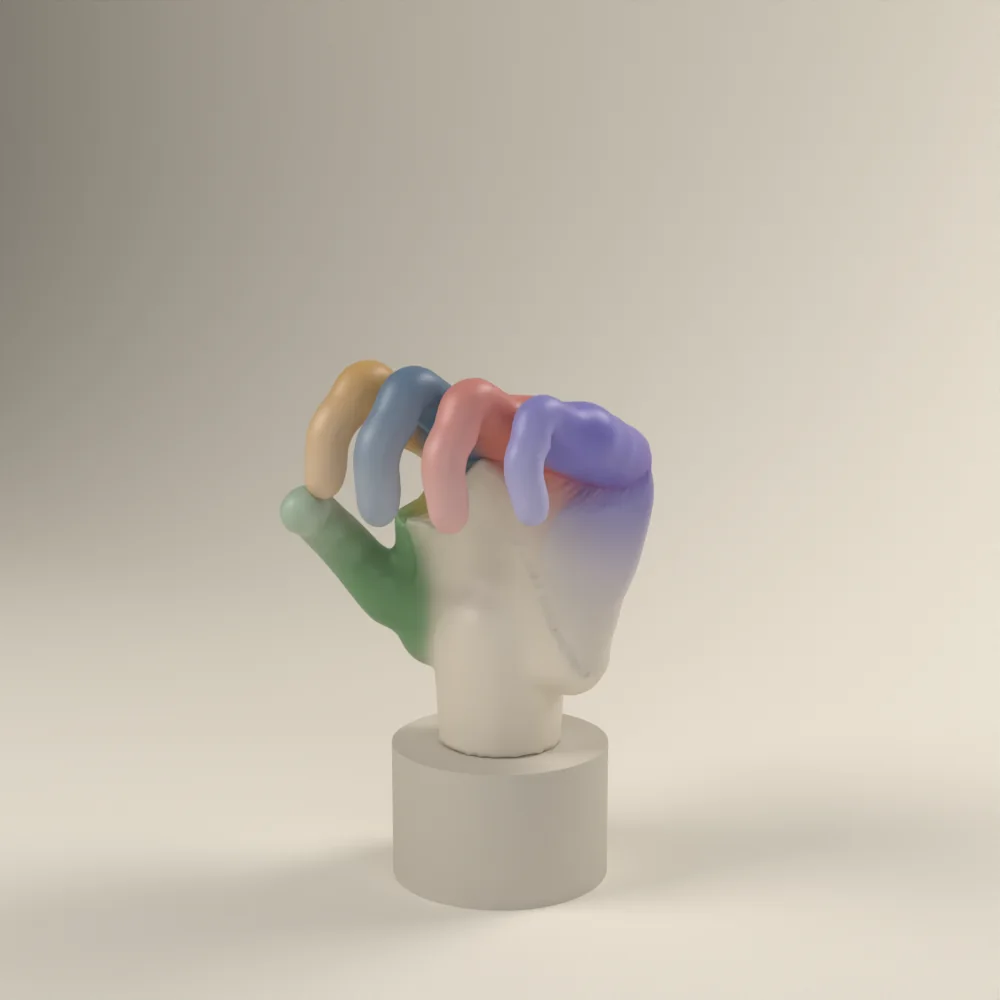
Both hands below have the same mesh and the same rig, with the fingers set close together. The colour shows how much weight each part of a finger takes from the other fingers' bones: sand means none, red means 15% or more. The palm and the webbing between knuckles are left neutral, because blending there is expected. With Distance weighting, the sides of the fingers that face each other pick up their neighbours' weight. With the Hands & Fingers preset, they don't.
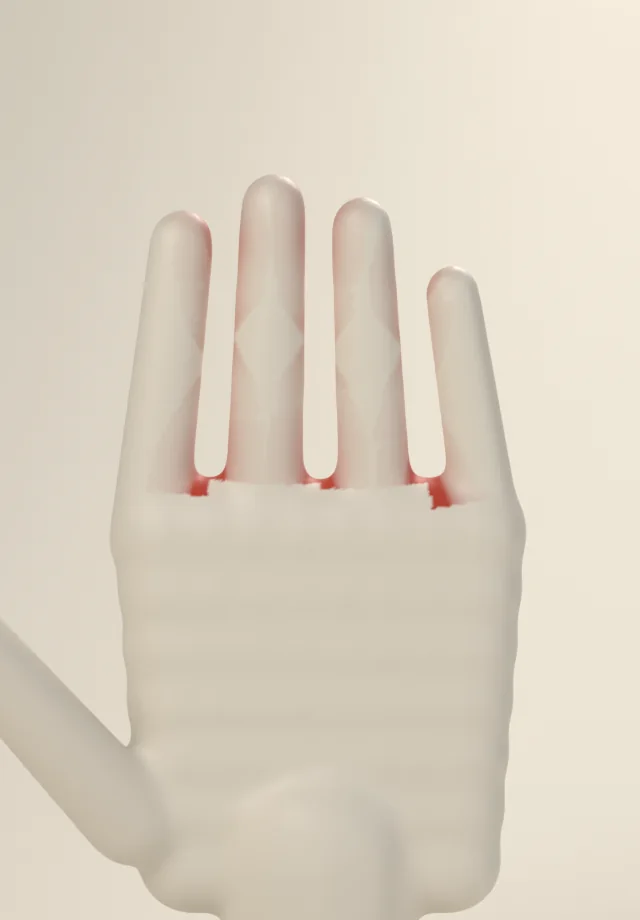
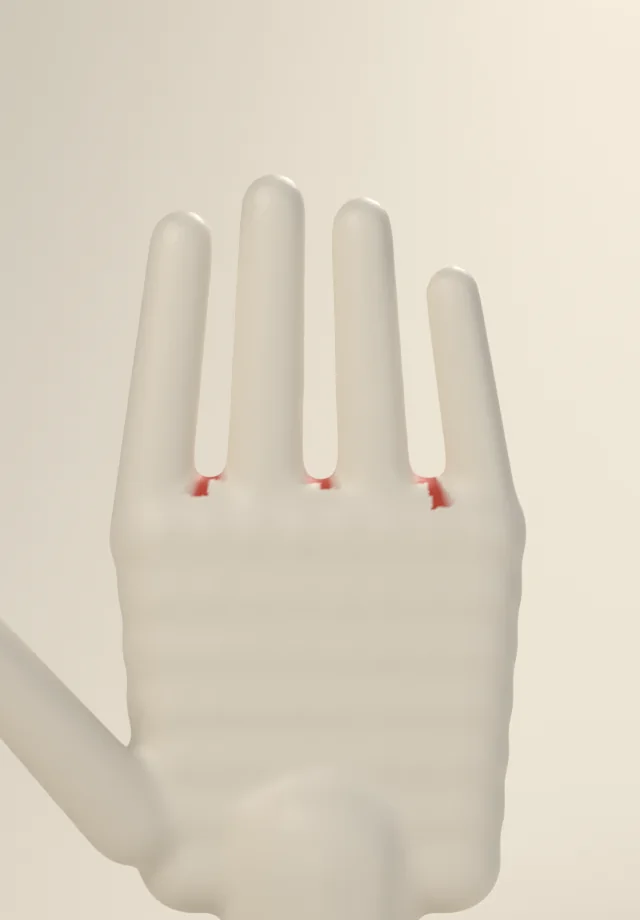
The surface is the only route the skin can actually stretch along. Measuring weight the same way makes the result match how a hand really moves.
Clothing that follows the skin
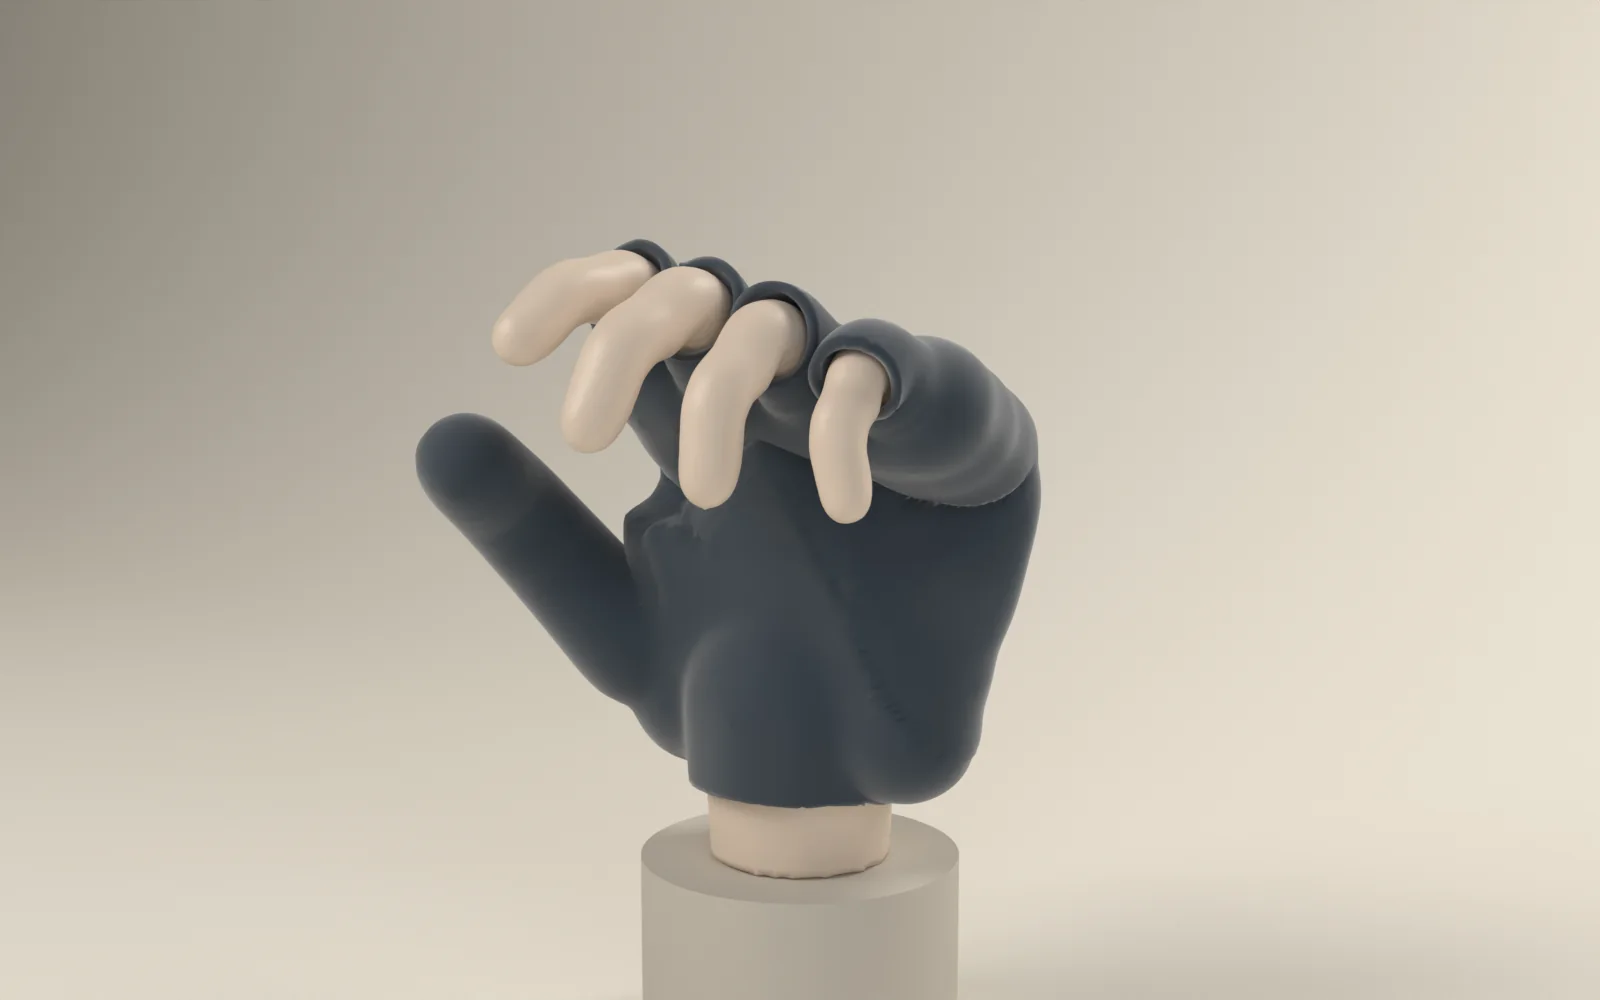
Binding a garment on its own gives it its own idea of where the joints are, and the skin pokes through as soon as the character moves. Fit Clothing to Body instead copies the weights of the body underneath, so garment and skin bend together. It writes only to the clothing; the body is read and never changed.
The copy is normal-aware. Plain nearest-point copying fails wherever cloth sits between two body parts. The inside of a sleeve is often nearer the torso than the arm, and the inner leg of a pair of trousers is near both legs. Auto Weight Pro only matches skin that faces the same way as the cloth. When the nearest skin faces the wrong way, it looks along the cloth's own normal for the skin it actually covers.
Measured on a bending finger
A glove of different topology was fitted over the test hand and one finger bent. This is how far the worst 1% of glove vertices drifted from the skin:
| Matching | Worst 1% |
|---|---|
| Nearest point | 13.9 cm |
| Normal-aware | 3.4 cm |
One part, one bone
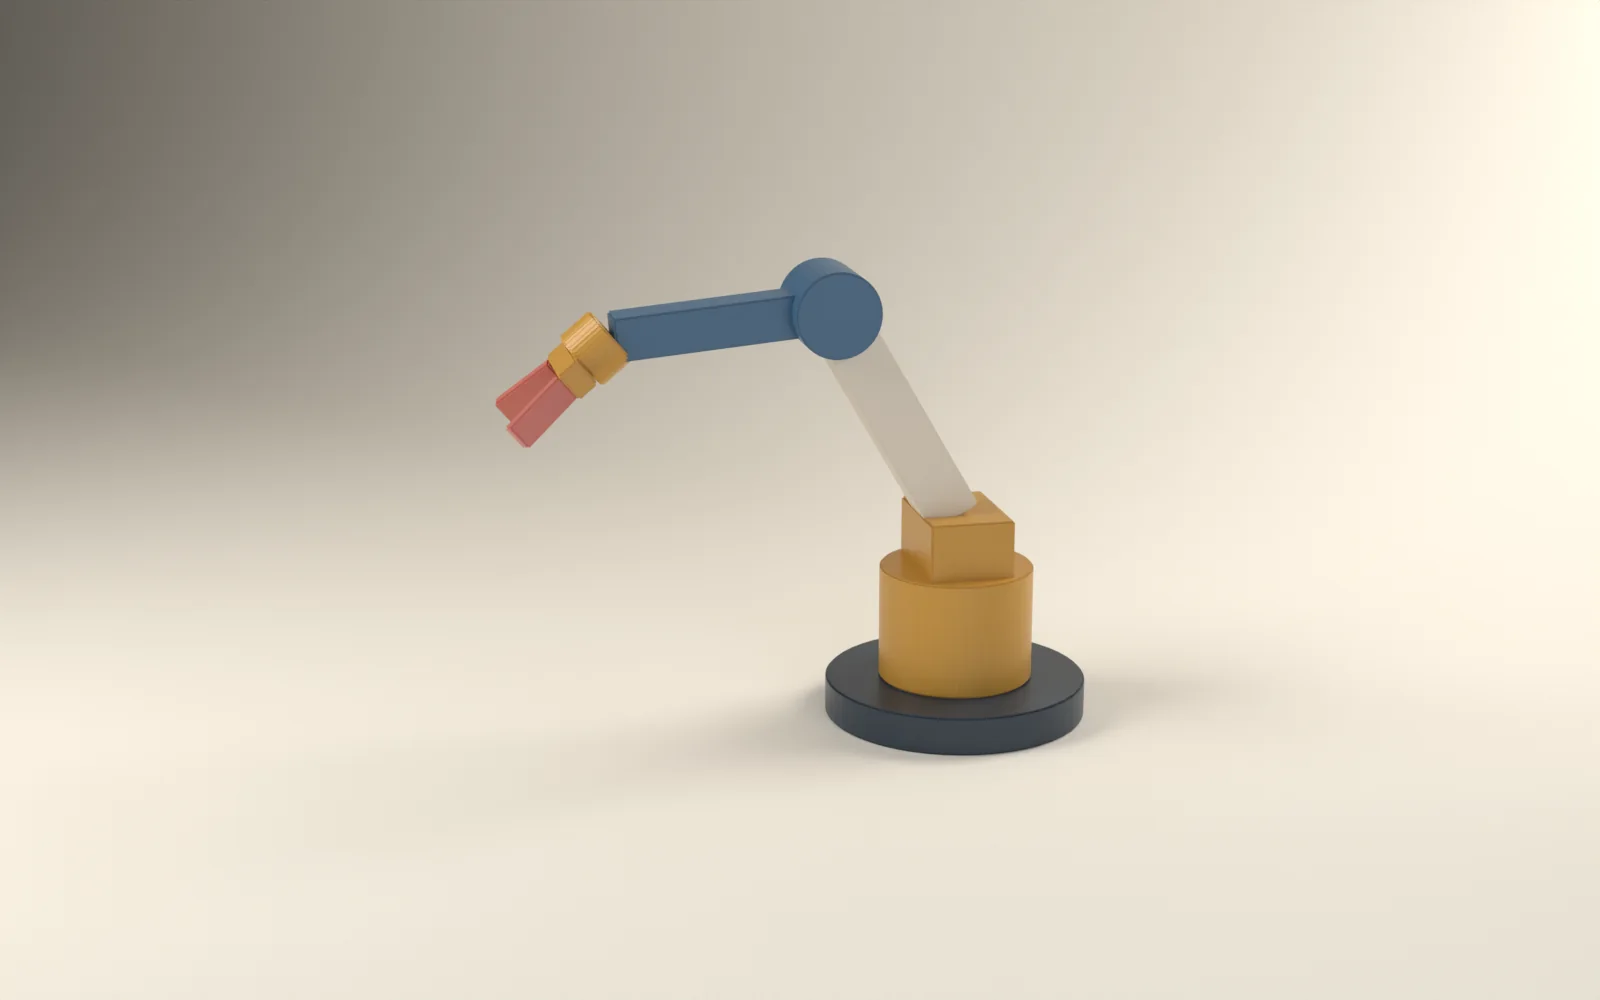
Robots, props, armour and animatronic shells shouldn't bend at all. Rigid (Per Part) finds every loose piece of the mesh and binds it 100% to the single bone it sits closest to, by averaging the distance from every vertex of the part rather than trusting one centre point. The Animatronic / Mechanical preset adds the right clean-up, one influence per vertex, and skips IK target bones.
Engineered to be trusted
A rigging tool has to be predictable before it is clever. The add-on is built around three rules: never change what the artist didn't select, never leave a vertex unweighted, and prove each feature with a test before it ships.
Non-destructive by design
- Copies, not your rig. Heat runs on throwaway copies of the mesh and armature, so it can bind to only the bones you choose without switching Deform off on your real rig.
- Selection is the boundary. Every tool writes only to the meshes you selected; tests check an unselected mesh stays bit-for-bit identical.
- Minimal writes. Only the weights that actually changed are written back, and everything is a single undo step.
Tested like production code
- 58 automated tests run in headless Blender: every method, mode, tool, preset, clothing fit, register and unregister.
- Three Blender versions: 4.2 LTS, 4.4 and 5.1, including the API changes in between.
- Measured, not assumed. Bleed, drift and timing figures on this page come from those tests. When a test model was wrong, it was rebuilt and re-measured.
User guide
Everything you need to install, use and get the most from Auto Weight Pro: the rules it follows, every setting, recommended workflows, the things to watch out for, and fixes for common problems. The same guide ships as README.md inside the download.
Up and running in a minute
Install
- Download
auto_weight_pro-1.2.0.zip. Don't unzip it. - In Blender, open Edit › Preferences › Get Extensions, then the ⌄ menu at the top right › Install from Disk…
- Choose the zip. To update later, install the new zip over the old one; your settings and presets are kept.
| Where to find it | |
|---|---|
| Main panels | 3D Viewport › Sidebar (N) › Auto Weight tab. The tab name can be changed in the add-on preferences. |
| Pie menu | Shift + Alt + W in Object, Pose and Weight Paint mode. Rebind it in the add-on preferences. |
| Menus | Ctrl + P › With Auto Weight Pro, and Weight Paint mode › Weights › Auto Weight Pro |
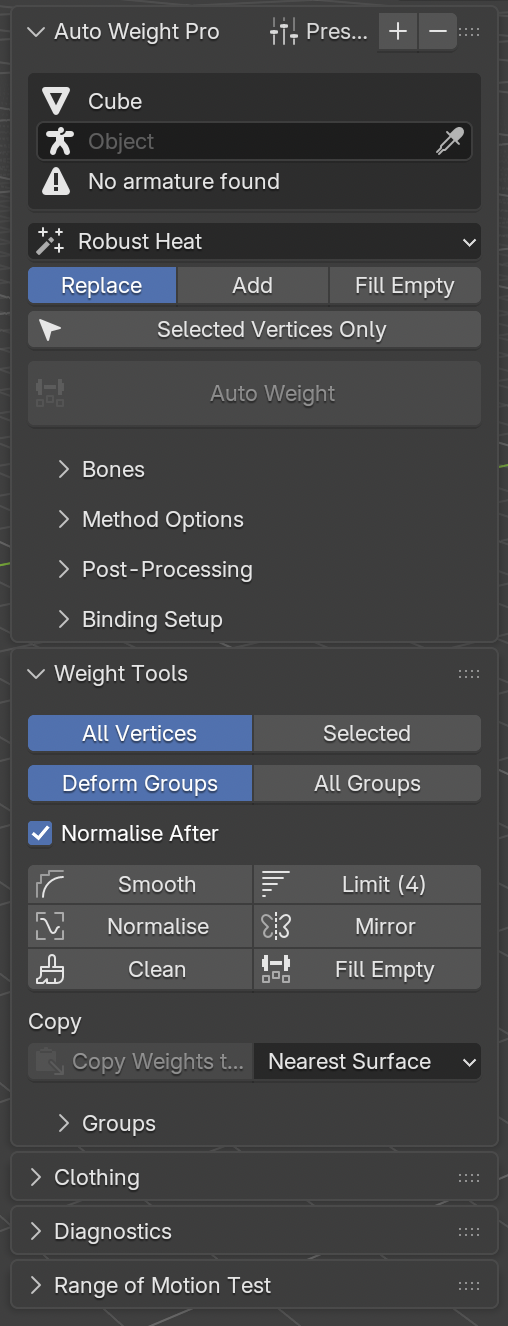
assets/ui-sidebar.png
assets/ui-pie.pngQuick start
- Select the mesh, then Shift-click the armature last so it is the active object. (Or fill in the Armature field once, or just select a mesh that already has an Armature modifier.)
- Choose a preset from the panel header, or pick a Method.
- Press Auto Weight.
- Open Diagnostics › Analyse Weights. Everything should show a green tick.
- Open Range of Motion Test › Create ROM Test, press Play, and watch every joint bend. Clear puts everything back.
Everything is undoable with Ctrl + Z.
Strict about what it changes
The rules are strict, so you can work on one piece of a character without risking the rest.
- It only writes to the meshes you have selected. Unselected meshes are never changed: weights, vertex groups, locks, modifiers and parenting all stay as they are. Automated tests run every tool on one mesh while checking that a second, unselected mesh stays bit-for-bit identical.
- Your armature is never modified by binding. Heat and envelope binding run on throwaway copies of the mesh and armature, deleted immediately afterwards.
- Each mesh is bound on its own. A clothing mesh sitting over the body doesn't change the body's result, and vice versa.
- Locked vertex groups are never changed by any tool. When you bind with some groups locked, the remaining weight (1 − locked weight) is shared among the unlocked bones.
| Action | What else it changes, so nothing surprises you |
|---|---|
| Auto Weight with Add Armature Modifier / Parent to Armature on | Adds or retargets an Armature modifier on the mesh and parents it to the rig. Both can be turned off in Binding Setup. |
| Mirror (post-process or tool) | Creates the opposite-side vertex groups (e.g. hand.R) if they are missing. |
| Fit Clothing to Body | Writes to the clothing only. The body is read, never written. |
| Range of Motion test | Temporarily swaps the rig's action and the scene frame range. Clear restores both. |
| Linked duplicates (Alt + D) | Two objects sharing one mesh share its weights, so changing one changes both. This is how Blender stores weights; use Object › Relations › Make Single User if you need them separate. |
The right method for the model
| Method | Use it for | How it works |
|---|---|---|
| Robust Heat (default) | Characters and most organic meshes | Blender's bone heat at a normalised scale, which fixes "Bone Heat Weighting: failed to find solution" on tiny or huge models. Anything heat still misses is retried through a watertight voxel proxy, then distance-filled. Nothing is left unweighted. |
| Bone Heat | When you want Blender's stock result | Standard Automatic Weights, on copies of your data. |
| Geodesic (Surface) | Hands, fingers, toes, and anything where parts sit close together: arms against the body, inner thighs, tails, tentacles | Each bone claims only the vertices it can see from its own centre line whose surface faces away from it, then spreads along the surface. Faster than heat on dense meshes and never fails. |
| Proxy Heat | Kitbashed, overlapping, non-manifold or many-part meshes | Binds a voxel-remeshed watertight shell and projects the weights back. Not for hands with touching fingers: the shell fuses them together. |
| Envelope | Rigs with hand-tuned bone envelope radii | Blender's Envelope Weights. |
| Distance Falloff | Fast blocking and simple shapes | Inverse distance to the bones through the air. Quick and predictable, but leaks between close parts. |
| Rigid (Per Vertex) | Hard mechanical deformation | Every vertex gets 100% from its closest bone. |
| Rigid (Per Part) | Robots, props, armour, animatronic shells | Every loose part moves 100% with the single bone it sits closest to. |
Quick decision guide
- An organic character with normal topology → Robust Heat, or Geodesic if limbs or fingers are close together.
- Hands, feet, fingers, toes → Geodesic with the Hands & Fingers preset.
- A messy sculpt or a kitbash that heat chokes on → Proxy Heat.
- Hard-surface or mechanical → Rigid (Per Part).
- Clothing over an already-weighted body → don't bind it; use Fit Clothing to Body.
Every setting, explained
Target
- Armature
- Leave empty to auto-detect: the active or selected armature, then the mesh's Armature modifier, then its parent.
- Apply · Replace
- Overwrites the existing deform weights on the affected vertices.
- Apply · Add
- Blends the new weights on top and re-normalises.
- Apply · Fill Empty
- Only weights vertices that currently have no deform weight.
- Selected Vertices Only
- Re-bind just part of a mesh. In Weight Paint mode it uses the vertex or face selection mask.
Bones
- Deform Bones Only
- Skips bones with Deform off (controls, IK targets, mechanism bones). Keep this on.
- Selected Bones Only
- Only bind to the bones selected in Pose mode. Use it to redo one finger, one limb or the face.
- Exclude
- Comma-separated name patterns to skip.
*matches any text,?matches one character; matching ignores case. Default:MCH-*, CTRL-*, *_IK*, *_ik*. The panel shows how many bones will be used.
Method options
| Setting | Applies to | Effect |
|---|---|---|
| Scale Fix | Robust Heat, Proxy Heat | Binds at a normalised size. Leave on. |
| Proxy Fallback / Proxy Res | Robust Heat, Proxy Heat | Voxels across the longest side of the proxy. Raise it if thin parts get merged. |
| Fill Gaps | Heat, Envelope | Distance-fills anything left unweighted. |
| Falloff | Distance, Geodesic, fills | How fast influence fades. Higher = crisper joints, lower = softer blends. Fingers 6–8, bodies 4–5. |
| Blend Bones | Distance, Geodesic | How many bones each vertex can mix. 2 for fingers, 3 for bodies. |
| Visibility Check | Geodesic | The see-from-inside test that keeps touching parts apart. Only turn it off if your bones sit outside the mesh. |
| Use Bone Thickness | Distance, Geodesic, Rigid | Measures from the bone envelope's surface instead of its centre line. |
Post-processing
These run after every bind, in this order, and each can be switched on or off: Smooth (Iterations, Factor) → Clean (removes weights below Threshold) → Limit Influences (Max Bones) → Normalise (each vertex adds up to 1) → Mirror (copies +X to −X or the reverse using left/right names; centre vertices are made symmetrical).
Mirror understands .L/.R, _L/_R, .l/.r, Left/Right and the other Blender naming conventions, and needs a symmetrical mesh. Tolerance is how far apart a vertex and its mirror can be.
Binding Setup
- Add Armature Modifier
- Adds one, or retargets the existing one, and moves it to the top of the stack (it should run before Subdivision and similar).
- Parent to Armature
- Parents the mesh to the rig without moving it.
- Preserve Volume
- Dual-quaternion skinning. Reduces the "candy-wrapper" collapse in twisting joints like wrists and forearms.
- Reset Settings · 🗑
- Reset restores every default (it keeps the Armature and Body fields). 🗑 deletes any leftover
AWP_tmp_*data.
Tools for the finishing pass
Every tool respects Scope (All Vertices or Selected), Groups (Deform Groups or All Groups) and locked groups. With Normalise After on, Smooth, Clean and Limit re-normalise when they finish.
| Tool | What it does |
|---|---|
| Smooth | Averages weights with neighbouring vertices. Also re-applies the influence limit if Limit is on, because smoothing spreads influences. |
| Normalise | Makes every vertex's deform weights add up to 1, keeping locked groups fixed. |
| Clean | Removes weights below the threshold and drops zero-weight memberships. |
| Limit | Keeps only the strongest Max Bones influences per vertex. |
| Mirror | Mirrors across X using left/right names. Warns if some vertices have no mirror partner. |
| Fill Empty | Gives unweighted vertices distance weights from nearby bones. |
| Copy Weights to Selected | Copies weights from the active mesh onto the other selected meshes (Nearest Surface or Nearest Vertex). Surface mode is normal-aware. |
Groups
- Lock / Unlock / Invert in bulk.
- Lock Unselected Bones protects everything except the bones you selected, so you can paint one area safely.
- Add Missing Groups, Remove Empty Groups, Remove Non-Bone Groups (asks for confirmation), Sort by Bone Hierarchy.
Paint Helpers (Weight Paint mode)
- A brush weight slider, plus 0 / 0.1 / 0.25 / 0.5 / 0.75 / 1 buttons.
- Auto Normalise, Multi-Paint, X-Mirror with vertex-group mirroring.
- Vertex and face selection masks, and the zero-weight display (Zero Weights › Active shows unweighted areas in black).
Clothing, step by step
How to use it
- Weight the body first and check it with the ROM test.
- Select the clothing (one or several pieces).
- Either fill in Clothing › Body, or shift-click the body last so it's active.
- Press Fit Clothing to Body.
What it does
- Copies each garment vertex's weights from the nearest point on the body's skin that faces the same way, blended across that skin triangle.
- Max Distance: vertices further than this from the skin (skirt hems, capes, long coats, loose sleeves) are weighted to the nearest bones instead of copying the skin. 0 means always copy from the skin.
- Smooth (default 2 passes) so the garment bends softly instead of reproducing every crease in the skin weights.
- Applies your Clean and Limit Influences settings and normalises.
- Adds an Armature modifier matching the body's (same rig, same Preserve Volume), places it first, and parents the garment to the rig if Parent to Armature is on.
- Keep Outside Body (optional) adds an AWP Keep Outside Shrinkwrap after the Armature modifier that pushes any vertex that sinks into the body back out by Offset. Turning it off and re-fitting removes it.
Only the clothing is written to. The body's weights are never changed. A garment that shares mesh data with the body is skipped with a warning. Scope › Selected fits only the selected vertices of the garment, so you can refit just a sleeve.
Find problems before the animator does
Analyse Weights checks the selected meshes and lists:
| Check | Why it matters | Fix |
|---|---|---|
| Unweighted | Those vertices won't move with the rig | Click select, then Fill Empty or re-bind with Selected Vertices Only |
| Over N bones | Game engines usually allow 4 influences per vertex | Limit |
| Not normalised | Vertices drift or shrink when posed | Normalise |
| Max influences | The worst case on the mesh | |
| Empty groups | Clutter | Remove Empty Groups |
| Non-bone groups | Leftovers from other rigs; harmless, but they can confuse exporters | Remove Non-Bone Groups (check they aren't used by other modifiers first) |
| Missing deform groups | A deform bone that matches your filters has no group | Add Missing Groups, or re-bind |
The select icon next to a problem selects those vertices and switches on the vertex mask so you can see them in Weight Paint mode.
Range of Motion test
Keys each target bone bending ± Angle on the chosen axes, one bone after another, Frames per Bone apart. Press Play and look for collapsing joints, spikes, or parts that don't follow. It uses the Bones filters, so set Selected Bones Only to test just the hand. Clear removes the test animation and restores your original action, pose and frame range. Your original action gets a fake user while it is swapped out, so it can't be lost.
Start from a known good
The header menu loads and saves presets. + saves the current settings and − deletes the active preset. Presets store every setting except the Armature and Body fields. Deleted built-in presets can be restored from the add-on preferences.
| Preset | Method | For |
|---|---|---|
| Organic Character | Robust Heat | General characters. 4 bones, light smoothing, Preserve Volume |
| Detailed Character (Geodesic) | Geodesic | Characters with close-together limbs or fingers, or lots of detail |
| Hands & Fingers | Geodesic | Falloff 6, 2 blend bones, light smoothing: crisp knuckles, no bleed between fingers |
| Game Ready (4 Bones) | Robust Heat | Strict 4-influence limit, stronger clean |
| Soft Stylised | Robust Heat | Cartoon and squash-and-stretch characters: heavy smoothing, 6 bones |
| Messy / Kitbash Mesh | Proxy Heat | Overlapping or non-manifold meshes |
| Hard Surface (Rigid Parts) | Rigid (Per Part) | Mechanical parts, one bone each |
| Animatronic / Mechanical | Rigid (Per Part) | Like Hard Surface, and also skips *target* helper bones |
| Quick Blockout (Distance) | Distance | Fast blocking, 2 bones per vertex |
Proven routes, start to finish
AA full character, start to finish
- Prepare. Apply rotation and scale on the mesh and the rig (Ctrl + A › Rotation & Scale). Recalculate normals outside (Edit mode › Shift + N). Make sure the rig is in its rest pose.
- Bind the body only. Use Organic Character, or Detailed Character (Geodesic) if arms or legs sit close to the body.
- Analyse. Fix anything red.
- ROM test. Scrub through the animation and note the problem joints.
- Fix the hands separately (workflow B). Do the same for feet, toes and the face if needed.
- Paint the last details by hand. Select a bone, use Lock Unselected Bones, paint, then unlock.
- Fit the clothing (workflow C).
- Analyse again, then save a preset so the next character takes one click.
BHands and fingers
- Load Hands & Fingers.
- In Weight Paint mode, select the hand vertices with the mask, and the hand and finger bones in Pose mode.
- Turn on Selected Vertices Only and Selected Bones Only, set Apply to Replace, and press Auto Weight. Only the hand changes.
- ROM-test just the hand bones.
- Knuckles too soft → raise Falloff (7–8). Too creased or faceted → lower it (4–5) or add a Smooth pass.
- Redoing one finger: select only that finger's bones and vertices and bind again.
- Bind one hand only and use Mirror for the other.
CClothing and accessories
- Make sure the body is finished first. Clothing copies whatever the body has.
- Select the clothing, set Clothing › Body, and press Fit Clothing to Body.
- Skirts, capes, long coats: set Max Distance to roughly the gap where the cloth stops hugging the skin (about 5–10 cm for a human-scale character). The hem then follows the leg bones instead of copying one leg's skin.
- Poke-through on tight clothing: turn on Keep Outside Body with a small Offset.
- Rigid accessories (belt buckles, armour plates, jewellery): don't fit them. Bind them with Rigid (Per Part) using Selected Bones Only, or parent them to a bone.
- Hair cards and other loose strands: Distance or Geodesic, with Selected Bones Only set to the head and hair bones.
DHard-surface robots and animatronics
- Name the bones clearly, one per moving part. Keep control and target bones non-deform, or exclude them by pattern.
- Use Animatronic / Mechanical (Rigid (Per Part), 1 bone per vertex, no smoothing).
- If a part follows the wrong bone, it is physically closer to the other bone. Re-bind it with Selected Vertices Only plus Selected Bones Only on the correct bone, or move the bone.
- Parts that must bend, such as rubber boots or cables, can be re-bound afterwards with Geodesic, using Selected Vertices Only.
EExporting to a game engine
- Game Ready (4 Bones), or set your engine's limit in Max Bones.
- Analyse: there should be 0 over the limit, 0 not normalised and 0 unweighted.
- Remove Empty Groups and Remove Non-Bone Groups before export.
- Turn off Preserve Volume if your engine doesn't support dual-quaternion skinning (most don't by default).
FFixing one problem area
- Mask-select the bad vertices in Weight Paint mode.
- Either Smooth with Scope set to Selected, or re-bind those vertices with Selected Vertices Only (try a different method or Falloff).
- Or lock the good bones (Lock Unselected Bones) and paint by hand.
Avoid the common traps
Before binding
- Apply transforms. Unapplied rotation or non-uniform scale is the most common cause of odd results in any auto-weighting.
- Normals must point outward. Geodesic and the clothing fit rely on them. Fix with Shift + N in Edit mode.
- Bind in the rest pose. Bones are read in rest position.
- Bones should sit inside the mesh. Geodesic reports "N bones outside mesh" when they don't.
- Check the bone filters. 0 of N bones will be used means the filters removed everything. Rigify: only
DEF-bones deform, which is correct.
While binding
- Select only what you mean to change. Selecting the body and the clothing re-binds both. Use Fit Clothing to Body instead.
- Replace overwrites. Use Add or Fill Empty, or lock groups, to protect hand-painted weights.
- Linked duplicates share weights.
- Fused geometry can't be separated. Fingers modelled joined with webbing will blend across the join in every method. Leave a small gap or edge loop between them.
- Proxy Heat fuses touching parts. Don't use it on hands.
- Dense meshes are slow with heat: about 20 s at 135k vertices. Geodesic is twice as fast; Distance and Rigid are near-instant.
After binding
- Mirror needs symmetry and good names. Vertices with no partner are left alone, and you are told how many.
- Modifier order matters. Armature should come before Subdivision, Solidify and so on. The add-on puts it first.
- Shape keys are ignored for binding: the basis shape is used.
- The ROM test animates your rig. Always Clear it before keyframing real animation.
- Keep Outside Body adds a Shrinkwrap, which costs performance on dense garments. It's best on tight clothing only.
Learned the hard way while making this page: the first test hand had fingers that touched at the base, and the voxel remesh webbed them together. Every method bled, Geodesic included, because the surface really did connect the fingers. Rebuilt with a real gap, Geodesic's neighbour movement dropped to exactly zero. Model the gaps you want the rig to respect.
Symptom, cause, fix
| Symptom | Likely cause | Fix |
|---|---|---|
| Auto Weight button greyed out | No mesh selected, or no armature found | Select the mesh, and make the armature active or set the Armature field |
| "No bones to bind" | The filters removed every bone | Check Deform Only, Selected Bones Only and Exclude |
| Vertices don't move when posed | Unweighted vertices, or a missing or disabled Armature modifier | Analyse › Unweighted › select › Fill Empty; check the modifier |
| One finger pulls its neighbour | A method that measures through the air (Distance, Envelope), or fingers fused in the model | Re-bind the hand with Geodesic / Hands & Fingers; check the fingers are separate |
| Joints look stiff or segmented | Falloff too high, or no smoothing | Lower Falloff, or add Smooth iterations |
| Joints look mushy | Falloff too low, or too much smoothing | Raise Falloff, reduce Smooth |
| Wrist or forearm collapses when twisted | Linear skinning | Turn on Preserve Volume |
| Clothing pokes through skin | The garment was bound separately, or it is very tight | Fit Clothing to Body; turn on Keep Outside Body |
| Skirt hem sticks to one leg | It is copying the nearest leg's skin | Set Max Distance so the hem uses bone distance instead |
| Mirror did nothing | Names have no L/R side, or the mesh isn't symmetrical | Rename the bones, raise Tolerance |
Objects called AWP_tmp_* in the scene | Blender was interrupted mid-bind | Binding Setup › 🗑 |
| Changes to the sidebar tab name don't show | Toggle the add-on off and on |
Measured, not promised
Timings were measured headless on a two-core cloud Linux machine; a desktop will be faster.
| Mesh | Robust Heat | Geodesic | Distance | Rigid (Per Part) |
|---|---|---|---|---|
| 32k vertices, 8 bones | 5.5–6.5 s | 1.8–2.0 s | 0.4 s | 0.35 s |
| 135k-vertex hand, 13 bones | 21 s | 11 s | 4.5 s | n/a |
Finger bleed test on awp_finger_test.blend (four fingers, three bones each, plus a palm): the share of finger vertices taking more than 5% weight from a neighbouring finger.
| Method | Fingers 2 cm apart | Fingers touching |
|---|---|---|
| Distance Falloff | 57% | 59% |
| Bone Heat | 0% | 0% |
| Geodesic | 0% | 0% |
Bone Heat is also clean on these simple shapes. Geodesic's advantages are that it never fails the way heat sometimes does, and it is roughly two to three times faster on dense meshes.
Release history
- 1.2.0
- Fit Clothing to Body: normal-aware weight copy, Max Distance for loose cloth, smoothing, a matching Armature modifier and an optional Keep Outside Body Shrinkwrap. Copy Weights to Selected is now normal-aware too. Reset Settings keeps the Body field. The guide was rewritten in full.
- 1.1.0
- Geodesic (Surface) method with a visibility and facing test; Hands & Fingers and Detailed Character (Geodesic) presets.
- 1.0.0
- First release: seven binding methods, the post-processing pipeline, weight tools, group housekeeping, paint helpers, diagnostics, the range-of-motion test, presets and the pie menu.